Supercharge Your GoTo Telescope with Wireless Smartphone Control
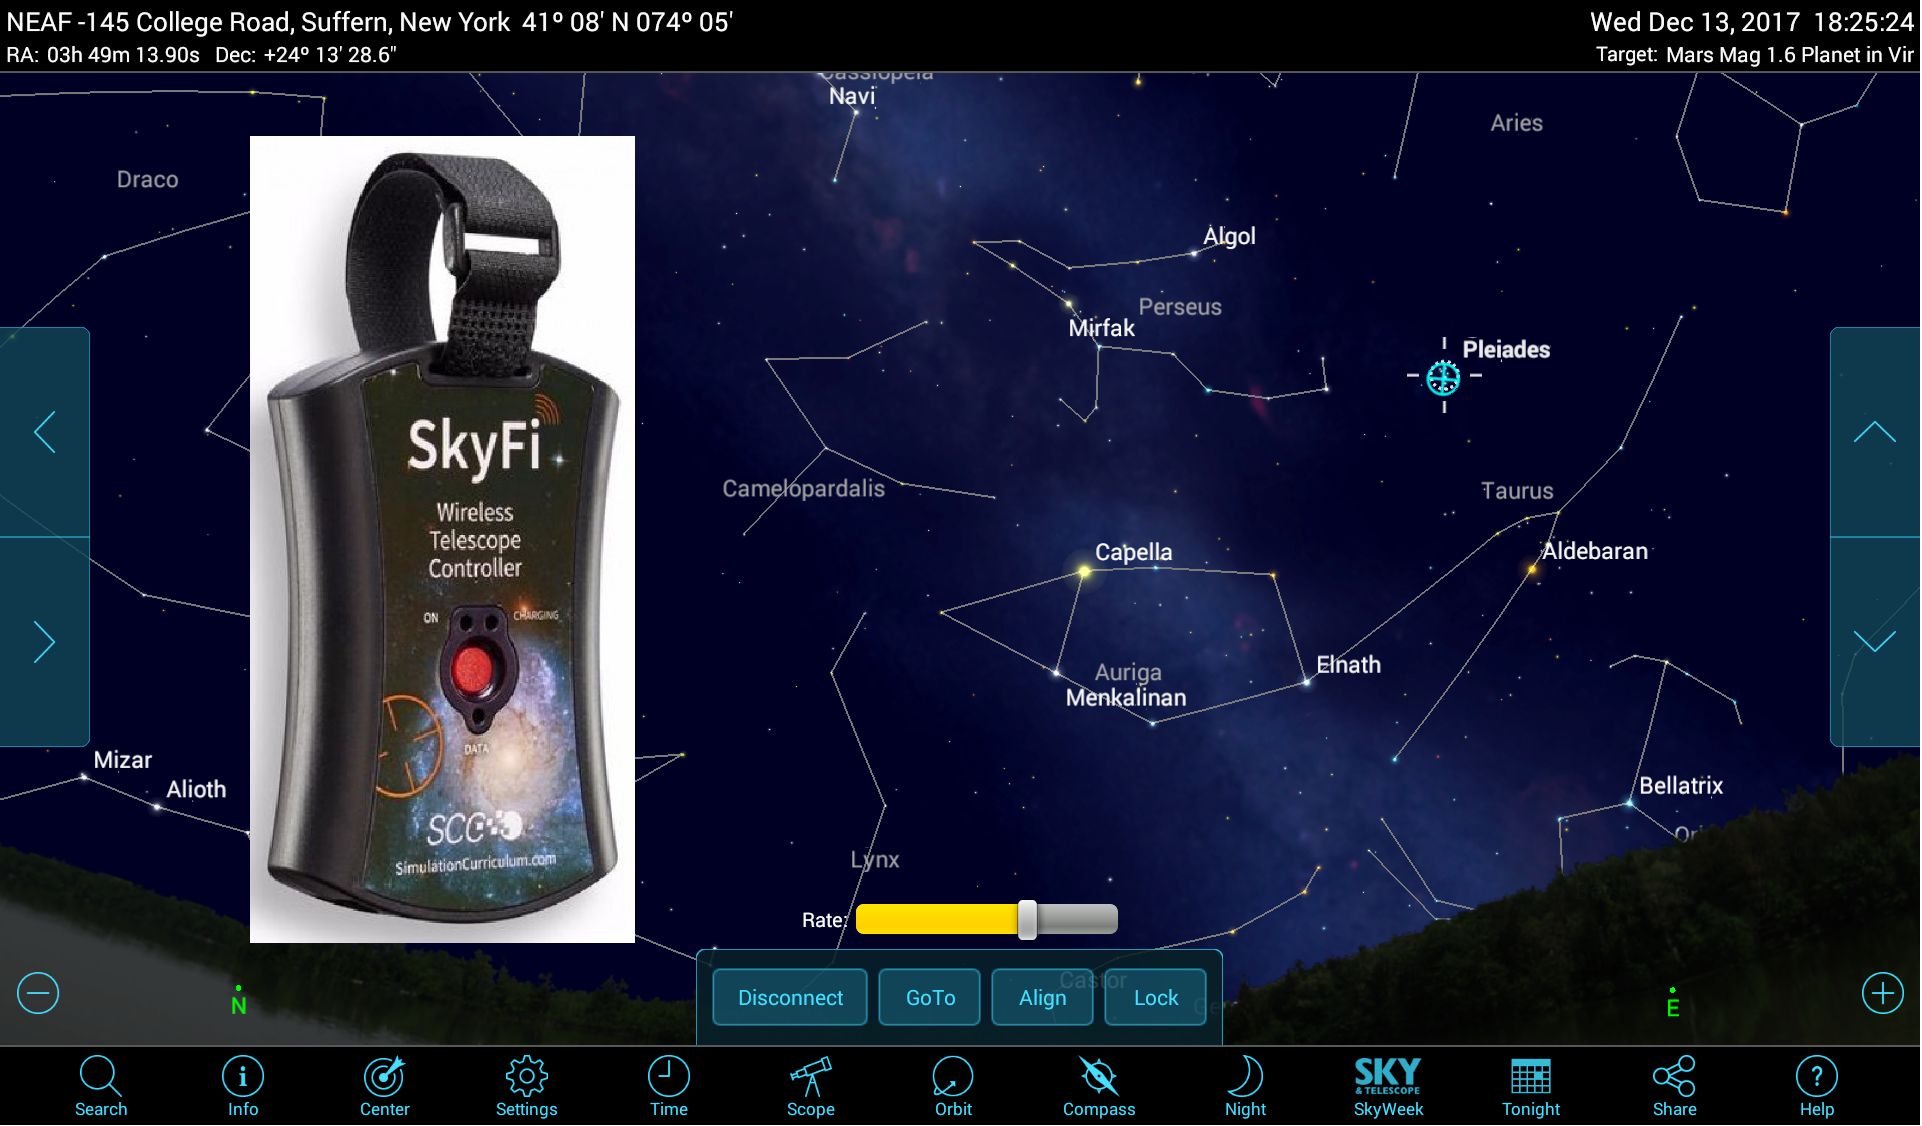
This article was provided by Simulation Curriculum, the leader in space science curriculum solutions and the makers of the SkyFi III wireless telescope controller and the SkySafari app for Android and iOS.
A backyard computerized GoTo telescope can automatically locate just about anything a beginner skywatcher might want to see. But how do you find out which objects are available when you are observing? And what do you do if that newly discovered comet or asteroid is not in your telescope's internal database? Perhaps you'd like to see a star known to host orbiting exoplanets, but your telescope can't find that star. One way to approach this problem is to link your telescope to an astronomy app and control it wirelessly with your phone.
A number of vendors make hardware and software that let you remotely steer computerized GoTo telescopes. For example, Simulation Curriculum's new SkyFi III Wireless Telescope Controller integrates with the company's SkySafari 5 app and Starry Night desktop software to control many GoTo telescopes. Meade's Stella Wi-fi Adapter is a rebranded version of the same hardware, and the company's StellaAccess app has SkySafari under the hood. And Orion's StarSeek and its corresponding StarSeek 5 app use the same Simulation Curriculum technology. All three brands are interoperable.
Celestron sells the Skyportal Wifi Module for controlling its telescopes. The matching SkyPortal app is also adapted from SkySafari, but this hardware and software pairing is limited to Celestron telescopes. Celestron also sells a line of telescopes called NexStar Evolution that have Wi-Fi hardware built into them.
Recently, I took a SkyFi III Wireless Telescope Controller for a spin — and I was impressed. In this edition of Mobile Astronomy, we'll describe how these devices work and what they do well, as well as offer some tips for making the most of them, whether your GoTo telescope is a starter model or an advanced professional system. [Best Telescopes for the Money - 2017 Reviews and Guide]
Why wireless?
Let's face it — computerized GoTo telescopes, which locate and track objects automatically in the night sky, are already cool and fun. But operating your telescope by remote control takes that to another level. I recently tried out the SkyFi III Wireless Telescope Controller from Simulation Curriculum. I had previously used the company's SkyFi 2 WiFi and SkyBT Bluetooth devices, so I was keen to check out the SkyFi III. My test telescopes included a Meade LightSwitch alt-azimuth GoTo system, an iOptron SmartEQ German equatorial mount and a Skywatcher HEQ5 Pro German equatorial mount with a SynScan hand controller. All three systems were controlled easily by the SkyFi III unit. Wireless telescope control paired with the SkySafari 5 app offers some major benefits to skywatchers of all experience levels. Let's take a look at a few of them.
Backyard computerized GoTo telescopes have a built-in database of objects for you to choose from — including the moon, planets, asteroids, the brightest stars, and selected star clusters, nebulas and galaxies. Entry-level systems from Celestron, Meade, Skywatcher and other vendors typically store between a few thousand and 40,000 astronomical objects, most of which are stars. Some of the higher-end semiprofessional systems have 150,000 objects in their databases.
Breaking space news, the latest updates on rocket launches, skywatching events and more!
From time to time, as new comets and asteroids are discovered, faint stars explode as novas and new satellites are launched, the object databases need updating. Most GoTo systems have a way to attach the telescope to your computer to accomplish this. But the process can be finicky, and sometimes frustrating, for beginners. And many veteran astronomers, myself included, don't bother doing it.
The SkyFi III Wireless Telescope Controller lets you operate your telescope with your mobile device, using the SkySafari 5 Plus (or Pro version) app for Android or iOS. The Plus version of SkySafari 5 contains nearly 3 million objects, including more than 31,500 deep-sky objects, 16,000 asteroids and minor planets, nearly 1,500 satellites, and more than 600 comets. As new objects are discovered or existing objects' orbits are refined, the app updates its database automatically for you.
The Pro version of SkySafari 5 contains nearly 28 million objects. Now, obviously there's more here than your telescope can see — but the ability to summon up-to-date positions, descriptions and images for objects with a few finger taps is extremely handy. And if you trade up to a more powerful telescope, the SkyFi III controller will migrate to it. The supported telescopes and mounts are listed on this page.
Deciding what to observe next can be a challenge for beginners who are still learning the sky. The SkySafari 5 app can show you at a glance what's up now by enabling its compass mode and panning around. Or, you can get suggestions for what to observe by accessing the Tonight's Best list in the Search menu, by tapping the Sky & Telescope SkyWeek icon on the main display or by tapping the Tonight icon. The latter lists the locations, and rise and set times, for major planets and satellites. Then, simply pick an object, and command the telescope to slew (the term for telescope movement) to it for a look. We'll cover how below. [SkySafari 5 Is Here: What You Need to Know to Pick Your App Level]
One of my favorite benefits for a wireless telescope controller occurs during winter observing. Once the controller is linked to your telescope, you can select and slew to objects using a stylus on your phone or tablet, leaving your fingers toasty warm inside your gloves. And if you need to head inside to warm up, you can power off the SkyFi III and restart it when you return; the telescope will still be aligned and ready to go. If you engage in video or DSLR camera astronomy, the SkyFi III will let you operate your telescope from indoors.
Read on to learn what the SkyFi III includes, how to hook it up and how to control your telescope.
What's in the package?
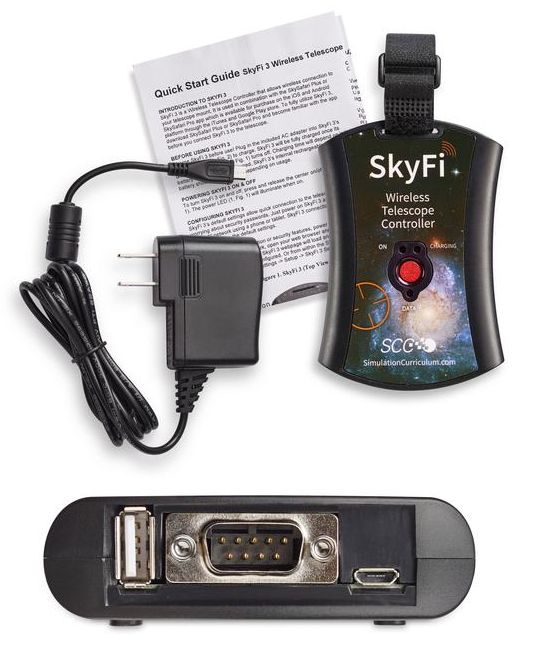
The SkyFi III Wireless Telescope Controller is about the size of a small cellphone, and installing and activating the controller took less than a minute. A built-in Velcro strap allows for mounting on the telescope. To allow you to connect to the telescope, the SkyFi III has a built-in nine-pin D-Sub connector for serial connections and a standard USB-A port. A micro-USB port for charging the internal lithium-ion batteries is also included. The unit should operate for 10 to 12 hours on a charge, depending on the outside temperature. A micro-USB terminated AC adapter is provided, but you can also charge the SkyFi III from a standard powered 5V USB port and cable (not included). The controller's internal rechargeable battery lets you power it up without having to install fresh batteries or use external power cables.
To power the SkyFi III on and off, you push the single large button. When you hold down the button for 5 seconds, the SkyFi III resets to its factory defaults. A red LED is lit while the unit is on, and another LED lights up while it's charging. A third Data LED flashes when the batteries drop below 25 percent charge (and also flash during the factory reset procedure).
With USB telescopes, a standard USB cable connects the SkyFi III's USB Type-A port to the telescope's USB Type-B port. With serial telescopes, you need a serial cable to connect your telescope's RS-232 port to a standard PC DB9 male serial port. Each telescope manufacturer may require a different serial cable. If your telescope vendor didn't provide one, you can get serial cables for most brands from Simulation Curriculum for $29.95.
Some telescope brands have their serial ports on the mount, while others have it on the hand controller (usually at the bottom, beside the coiled cable's plug). Consult your manual. To avoid damaging the telescope or the SkyFi III, be sure to use ONLY the telescope's serial port when connecting the two.
Linking SkyFi III to your telescope
To get started, set up your telescope, align it to the stars in the usual way and connect the SkyFi III cable. When switched on, the SkyFi III wireless telescope controller broadcasts an open local 802.11 network that your Android or Apple device, or your computer, can join. (On previous SkyFi models, some Android devices couldn't connect to those "ad hoc" networks.)
On your phone or tablet, navigate to the Wi-Fi Connections menu, and join the open network named "SkyFi." Note that while your device is logged in to the SkyFi III network, it will be able to reach the internet only via your cellular provider, not Wi-Fi.
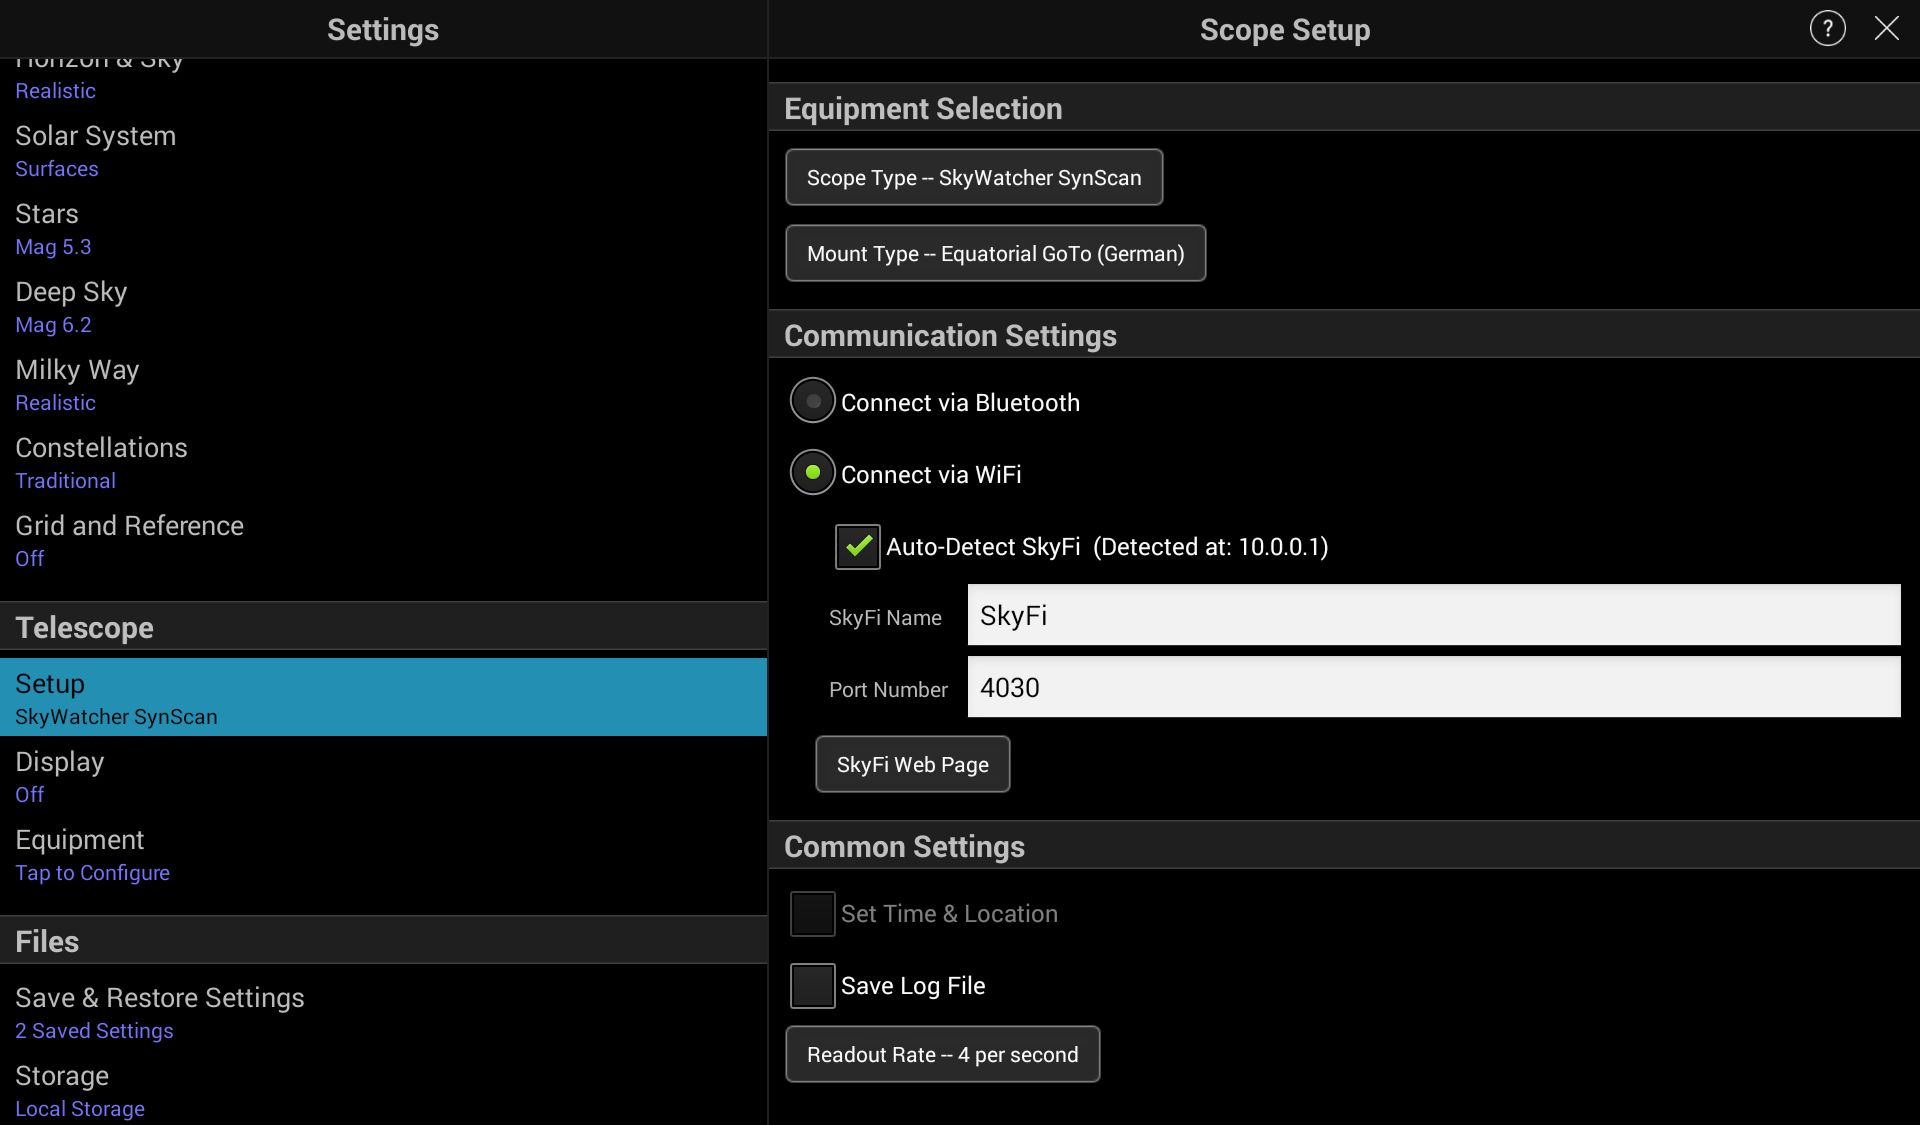
Launch the SkySafari 5 app, and open the Settings menu. In the Telescope subsection, tap Setup. Tap Scope Type, and find your telescope in the extensive list (or select the Demo Interface to practice without a telescope attached). Then, exit this menu. Tap Mount Type, and choose your style of mount — most telescopes are either Equatorial GoTo (German) or Alt-Az. GoTo. Then, exit that submenu. To finish setting up, under the Communications Settings subsection, choose Connect via Wi-Fi. I found that Auto-Detect SkyFi worked on all of my devices.
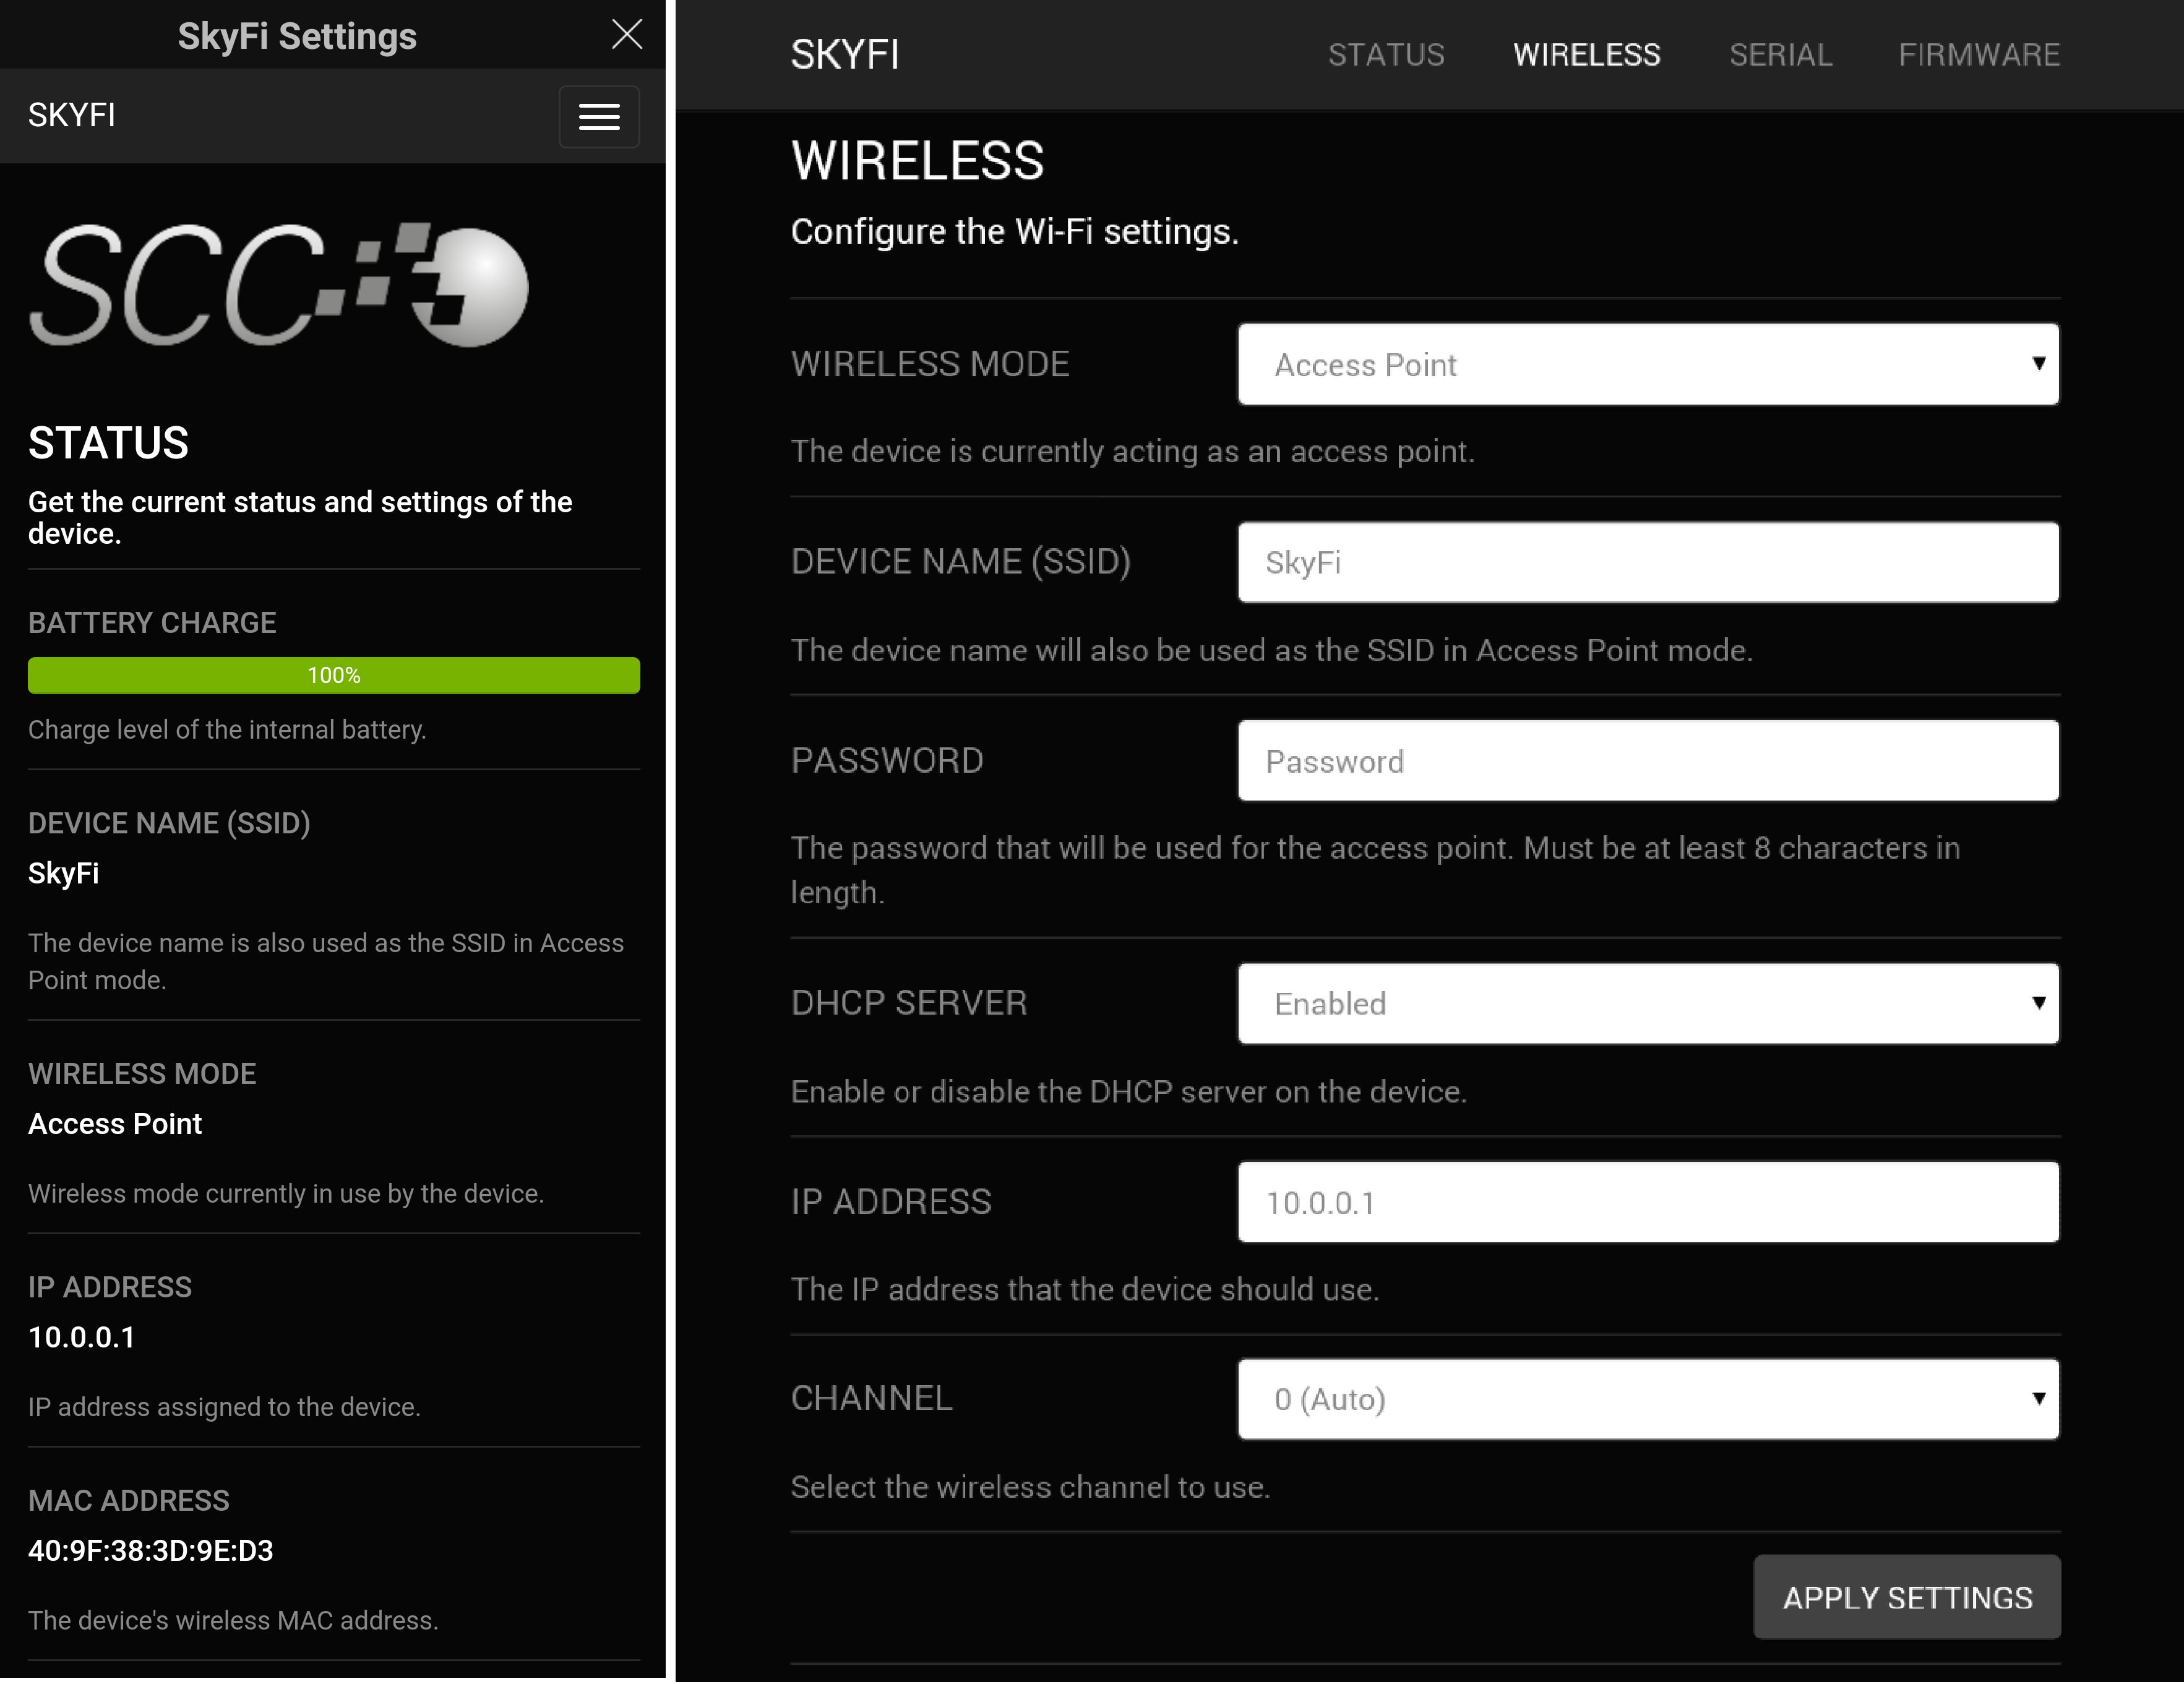
The SkyFi Web Page button at the bottom of this menu page lets you open and review the SkyFi III's settings while you are logged in to its network. (You can perform the same operations by connecting to the SkyFi III from your computer and using a browser to navigate to IP address 10.0.0.1.)
The SkyFi's main Status page shows the battery charge level, the device name ("SkyFi" is the factory default), the wireless mode in use and the unit's IP address and MAC address. To modify any of the SkiFi III's settings, use the navigation tabs at the top of the page.
On the Wireless Settings page, you can change the default network name in case you own multiple SkyFy III controllers or observers near you have one of their own. You can also enter a password to prevent another user from linking to your SkyFi III and controlling your telescope. Change the Channel setting if the connection to your telescope is not reliable due to radio interference. Click Apply Settings to save any changes.
The Serial Interface page allows the SkyFi's RS-232 and USB ports to be configured. The defaults would only need to be changed in the unlikely event that the telescope mount used different serial communications settings. The Firmware page displays the current firmware version. Simulation Curriculum's SkyFi III support page has links to firmware files to download and store on your computer. To update the SkyFi III, simply click the Choose File button, select the file on your computer and click Update Firmware. My unit arrived with firmware version 1.3.2 (although version 1.3.3 is available).
Remember that you can always return the SkyFi III to its factory defaults by pressing and holding its power button until the Data LED flashes quickly. [How to Snap Awesome Photos of Night-Sky Objects with Your Smartphone]
Controlling the telescope wirelessly
To control your telescope with the SkySafari 5 app, tap the Telescope icon on the main screen. This will launch a menu with buttons labeled Connect, GoTo, Align, and Lock. Press Connect, and you'll see the button's label change to Disconnect. (Tapping Disconnect will switch off telescope control.) Once connected, the app's display will migrate to show the sky where the telescope is pointed. If you see a large discrepancy, your telescope is probably not aligned properly.
When the devices are connected, telescope slewing buttons will appear to the left and right of the screen, with arrows indicating left, right, up, and down motions. A slider bar at the bottom of the display lets you set the rate at which the telescope slews when a direction button is tapped (for stepping) or held (for continuous movement). At the top of the display, the status bar expands to show details about the telescope's coordinates and the target object. To declutter your display, you can hide these items by tapping the Telescope icon; the telescope is still being controlled.
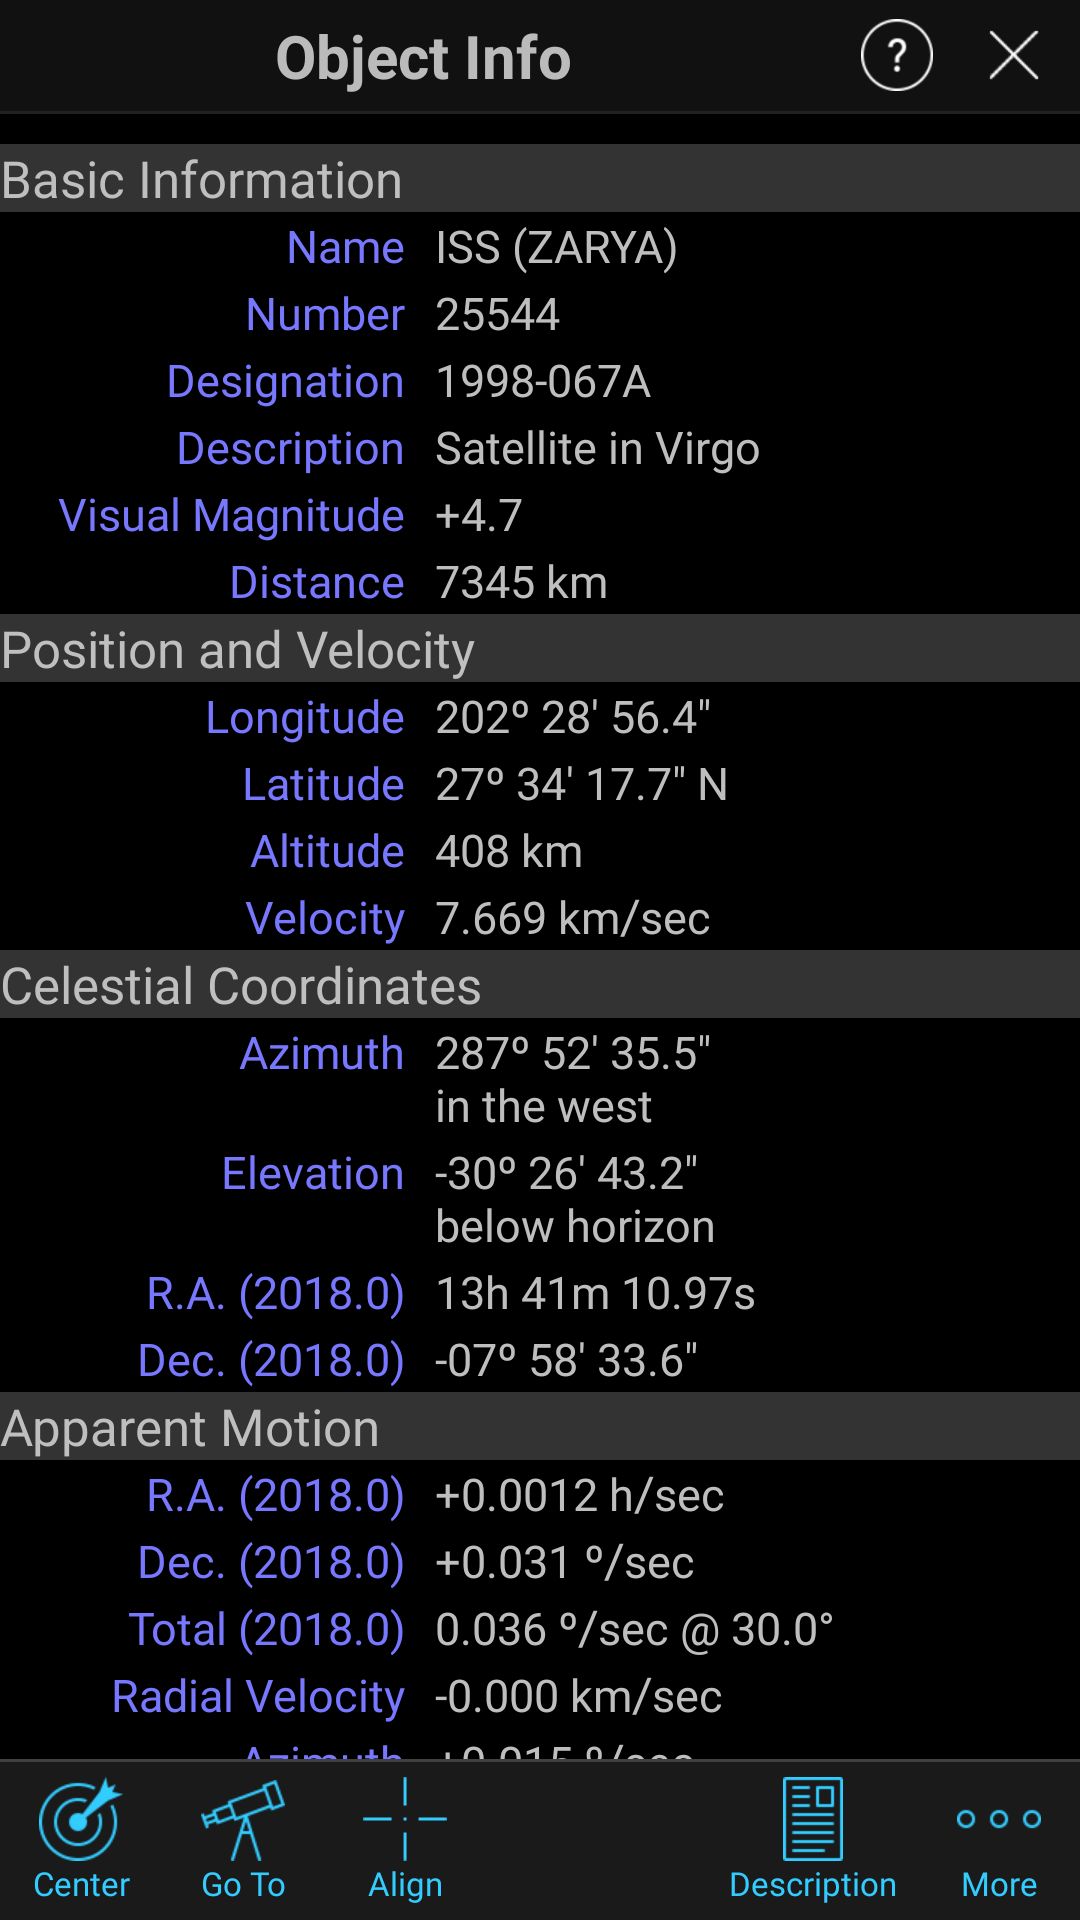
While telescope control is active, the app's Compass function is disabled. But you can still manually swipe the display to pan around the sky. Tap any object to select it; then tap the GoTo button, and the telescope will move to that object. Alternatively, you can use the Search menu. When you arrive at an object's Info page, a GoTo icon will be visible. When you tap it, the telescope will slew to observe that object. Note that you cannot "GoTo" an object that is below the horizon.
The SkyFi III's ability to find and center objects is only as good as your telescope's star alignment, so take some care when setting that up. If, after a GoTo, you still need to center the object in your telescope, you can use the app's Align button to eliminate the error. With the object centered in the eyepiece, select the same object in SkySafari 5 (by tapping it or searching for it). Then tap the app's Align button. This should correct for any differences in that region of the sky. You might need to redo the process after pointing somewhere else.
The Lock/Unlock button controls whether the app's sky chart stays centered on the telescope's position. I used it to re-center the display after swiping around the sky to look for targets.
Now you're ready to explore the universe! At this point, you have equipped your modest telescope with the ability to point at millions of objects. Check the SkySafari 5 Search menu to see if any comets are available. (Those above the horizon will be highlighted in the listing.) Do you want to see a satellite through your telescope? Search the list for bright ones passing now. Your telescope may not be able to continuously track objects moving that quickly, but repeated taps of the GoTo button will bring them back into the eyepiece. Use a low-power eyepiece to see a larger patch of sky so they'll remain in view longer.
The next time a faint star explodes in a nova, an asteroid zips near Earth or a supernova appears in a distant galaxy, you'll be able to slew to the target. The SkyFi III will help you get the most out of your equipment, and you might even be inspired to upgrade to a larger telescope!
Going beyond — seeing exoplanetary systems and more
The recent wave of exoplanet announcements has been exciting. Most of the discovered planets are orbiting modest stars that won't be included in a basic telescope's database. While your backyard telescope can't see the planets, it's fun to observe their stars and let the imagination soar. The SkySafari 5 app's star catalogs include many of these stars. For example, last month, astronomers reported the discovery of an Earth-size exoplanet only 11 light-years away, called Ross 128b. It orbits a cool red dwarf star named FI Virginis (in Virgo). The SkySafari 5 Plus app lists the star as 11th magnitude — fairly dim, but within reach of medium-size telescopes. That star is in the predawn sky, but you can track down others in the evening.
The SkyFi III controller lets you connect to your telescope from your computer. SkySafari software runs under Mac OS X/macOS. Simulation Curriculum's Starry Night software controls telescopes directly on Macs, and via a Virtual Serial Port on Windows. You can also use the Stellarium desktop program to control your telescopes via the SkyFi III.
In the next Mobile Astronomy column, we'll cover how to preview 2018's biggest celestial events using mobile astronomy apps. And next year we'll see how stars move and constellations change their shape over time, and much more. In the meantime, keep looking up!
Editor's note: Chris Vaughan is an astronomy public outreach and education specialist at AstroGeo, a member of the Royal Astronomical Society of Canada and an operator of the historic 74-foot (1.88 meters) David Dunlap Observatory telescope. You can reach him via email, and follow him on Twitter @astrogeoguy, as well as on Facebook and Tumblr.
Follow SkySafari on Twitter @SkySafariAstro. Follow us @Spacedotcom, Facebook and Google+. Original article on Space.com.
Chris Vaughan, aka @astrogeoguy, is an award-winning astronomer and Earth scientist with Astrogeo.ca, based near Toronto, Canada. He is a member of the Royal Astronomical Society of Canada and hosts their Insider's Guide to the Galaxy webcasts on YouTube. An avid visual astronomer, Chris operates the historic 74˝ telescope at the David Dunlap Observatory. He frequently organizes local star parties and solar astronomy sessions, and regularly delivers presentations about astronomy and Earth and planetary science, to students and the public in his Digital Starlab portable planetarium. His weekly Astronomy Skylights blog at www.AstroGeo.ca is enjoyed by readers worldwide. He is a regular contributor to SkyNews magazine, writes the monthly Night Sky Calendar for Space.com in cooperation with Simulation Curriculum, the creators of Starry Night and SkySafari, and content for several popular astronomy apps. His book "110 Things to See with a Telescope", was released in 2021.

